Showing posts with label Martha Stewart. Show all posts
Thursday, November 17, 2011
Martha's Tuile Leaves
Ever since I saw Martha Stewart's tuile leaves in her cookie book I wanted to make them for Thanksgiving. Last year, I did just that! Unfortunately, I did not have a leaf stencil so I used a cookie cutter which worked out fine though the process probably would've went quicker and more smoothly with a stencil!
I added them to a plate of chocolate spritz cookies that I made trying out my cookie press for the first time. Here's how it looked:
Check out the recipe: here.
Monday, July 4, 2011
Happy Fourth of July!
After seeing Martha Stewart make delightful fireworks cookies on the Today Show, we were inspired to try it ourselves along with some of our own patriotic designs (the stars). Also, we took this opportunity to test-drive our new mini cookie cutters (we used the star shape here). They were a big hit!
THE STARS:
THE FIREWORKS:
BIG FIREWORKS: Flood the cookie with just a layer of white royal icing. Then, using 2 squeeze bottles (one with blue, one with red), make about 3 circles over the white icing while it is still wet (alternating colors). Then, take a tooth pick and lightly pull out from the center (do that at least 4 times).
LITTLE FIREWORKS: Again, flood the cookie with white icing and then just make a dot (or filled in circle) of color on top while it's still wet. Use a tooth pick to pull out from the center making a firework design.
Happy Birthday, America!
For additional posts about our sugar cookies see:
Hoppy Easter!
Cookies Inspired by Barbie!
Purple, Purple, Purple
Sugar Cookie Recipe
Holiday Baking
Monday, May 2, 2011
Half Moons
Okay, so do you call these Black and White cookies or Half Moons?
I've called these delicious little guys Half Moons my whole life and I get really annoyed when I see them labeled as Black and White cookies. So, I did a little research. Apparently, they go by a few other names as well, Half and half cookie and drop cake. These cookies are particular popular in Manhattan and Northeastern New Jersey where they are known as Black and White Cookies. It is in New England and Upstate New York that they are commonly known as Half Moons. So, I guess that's why I've always known them as Half Moons. Mystery solved. (Wikipedia)
Anyway, these delightful treats have always been my Italian bakery favorite. I'm usually a 100% chocolate girl but there is just something about the cakey cookie and the not one, but two frosting flavors. There is a recipe mini versions Martha Stewart's cookie book and it's also online here. I was thrilled to try to make them myself and they came out with the perfect consistency. I was very satisfied!
The only tricky part is frosting them because you do it on the underside which isn't smooth. You have to be careful to not get pieces of cookie in the frosting - especially the white. Trying brushing them off a bit before you start frosting.
I'll leave you with this YouTube clip from the Dinner Party episode of Seinfeld in which Jerry discusses the black and white cookie and says "Look to the cookie!" Check it out here.
Wednesday, January 26, 2011
Hawaiian Themed Party!
We've always wanted to do a themed party. And surprisingly, we already had a lot of Hawaiian-themed stuff. I made these simple and beautiful hanging decorations that I adapted from a Martha Stewart Halloween craft.
For dinner, we made coconut shrimp and chicken coated in panko breadcrumbs on skewers. Also, as an afternoon appetizer, we made crab rangoons. Aloha!
Monday, January 10, 2011
Home-made Marshmellows!
What's better on a cold, snowy day than a cup of hot cocoa with a nice BIG marshmallow floating on top?
Maybe a big peppermint marshmallow? Yum, right? Chocolate and peppermint is one of my absolute favorite flavor combinations! Since I don't know where to find a mint marshmallows in a store, I recently learned how to make them myself!
I've been wanting to try out this recipe ever since last year, when I saw it on an episode of the Martha Stewart Show. This year, I finally did it! And they were so much easier than I anticipated!
The video on MarthaStewart.com is so great that I wont bore you with my instructions. Instead, you can watch Martha's video and read their instructions here. I will say, however, that the instructions are a little confusing in places. For example, they say to spray the baking pan and then cover it with plastic wrap. Instead, don't spray the pan, spray the plastic wrap!
For my marshmallows, I added a tiny bit of green food coloring to the recipe to be extra festive! Tip: If you decide to add a hint of peppermint, keep in mind that peppermint oil is not the same as peppermint extract. I learned this the hard way. My marshmallows came out almost too minty, by using peppermint oil instead of peppermint extract, like the recipe calls for.
If you watch Martha's video, you'll see that she mentions that some trendy gourmet restaurants actually serve marshmallows as dessert! I was very intrigued by this and had to investigate for myself. These two bloggers write about their meals at Jean-Georges in NYC - here and here - they even include photos of their marshmallow desserts. I also found some companies that make and sell gourmet marshmallows - plush puffs and Manna Mallows - with wonderful selections! I'm sure there are many more too!
Well, this has been my marshmallow journey! Does anyone have any favorite marshmallow flavors or recipes? Besides cocoa, what do you like to eat with marshmallows?
PS- We hope your NEW YEAR is off to a great start!
Maybe a big peppermint marshmallow? Yum, right? Chocolate and peppermint is one of my absolute favorite flavor combinations! Since I don't know where to find a mint marshmallows in a store, I recently learned how to make them myself!
I've been wanting to try out this recipe ever since last year, when I saw it on an episode of the Martha Stewart Show. This year, I finally did it! And they were so much easier than I anticipated!
The video on MarthaStewart.com is so great that I wont bore you with my instructions. Instead, you can watch Martha's video and read their instructions here. I will say, however, that the instructions are a little confusing in places. For example, they say to spray the baking pan and then cover it with plastic wrap. Instead, don't spray the pan, spray the plastic wrap!
For my marshmallows, I added a tiny bit of green food coloring to the recipe to be extra festive! Tip: If you decide to add a hint of peppermint, keep in mind that peppermint oil is not the same as peppermint extract. I learned this the hard way. My marshmallows came out almost too minty, by using peppermint oil instead of peppermint extract, like the recipe calls for.
| Before the confectionary sugar coating. Very sticky! |
| Enjoy in a nice cup of hot cocoa! Yum! |
Well, this has been my marshmallow journey! Does anyone have any favorite marshmallow flavors or recipes? Besides cocoa, what do you like to eat with marshmallows?
PS- We hope your NEW YEAR is off to a great start!
Tuesday, December 28, 2010
Holiday Baking
Cookies
I'd have to say that our favorite holiday project is a toss up between making ornaments and baking/decorating sugar cookies! This post is all about the desserts we made for our family Christmas party this year! While perusing the Martha Stewart website (we were searching for royal icing recipes at the time), we found these cute peppermint candy looking designs! Martha used a hard candy-shaped cookie-cutter, but, being resourceful, we figured that the simple circle cookie-cutter would look just as cute! (Really, you could use/try just about any simple design you have!) Here's how they came out:
There's a great how-to with step-by-step pictures for the marbleized peppermint-candy cookies on the Martha Stewart website here. We also did more traditional star, snowflake, and tree designs!
If you'd like to try our sugar cookie recipe, we'll put it in an up-coming post!
A few months back, we discovered Bakerella and her lovely cake pops! We instantly fell in love with the idea and her great designs. However, our first attempt at making them was slightly disastrous--it's a bit harder than it looks. Forming the cake base is easy, it's trying to get a smooth chocolate shell that's difficult. (That might depend on the type of chocolate used.) That being said, the cake balls are incredibly delicious! Instead of the pops, we opt to make the cake balls because they don't require a super smoothe coating (think chocolate truffles).
We have some topped with crushed peppermint candy canes and others with grated white chocolate to look like snow. How festive!
We tend to make something new every year. What are some of your favorite holiday dessert recipes?
Wednesday, December 8, 2010
Magazine Christmas Trees!
![]() |
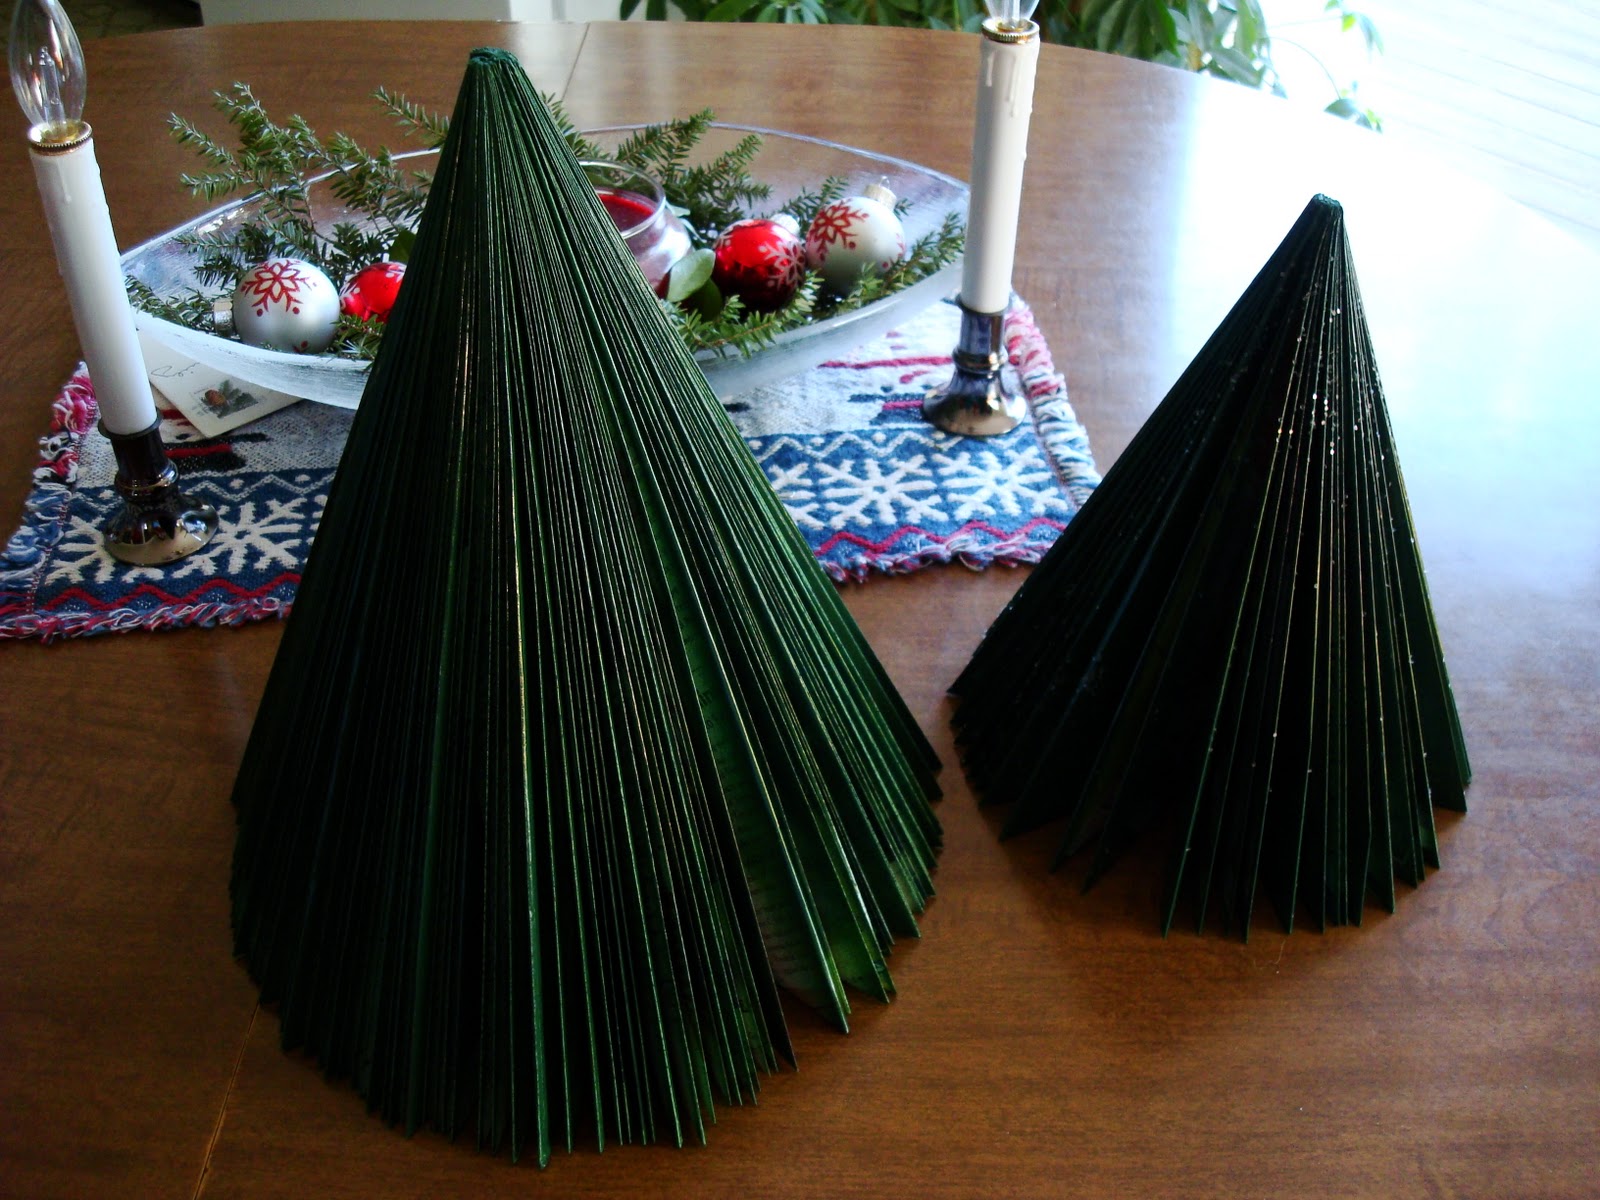
Last year, I discovered this wonderful craft while watching The Martha Stewart Show and I became addicted to making these magazine trees! Once you start you wont want to stop. They are so unbelievably easy to make because they are so self contained; All you really need is one magazine per tree plus some spray paint if you want to embellish it (but the trees even look cool unpainted!). This is one of the most satisfing craft projects I've ever done and they look so great when finished! There is a great video of the process from the Martha Stewart website; I encourage you all to watch, here. But here are some photos of my process.
| 1st fold: fold top left corner over to the edge, making a point at the top. (It's like making a paper airplane). |
| 2nd fold: fold newly folded edge over to the seam, keeping a sharp point at the top. (Again, very much like the wing of a paper airplane!) |
| 3rd fold: fold over (and tuck in) the little triangles that are hanging down so that the bottom is flat. |
Here is my finished product!
Some tips for those of you who give this a try:
- Magazines with staple binding wont work; they must be the kind with glue (Good Housekeeping, not Time). Plus, you must thoroughly bend ("brake in") the binding so the tree will fan out front cover to back cover.
- The more pages the magazine has, the fuller and better the tree will look.
- Make sure each fold is really clean and uniform so that the top of the tree is nicely pointed.
- To make a little forest of trees, it's nice to find magazines that are different sizes. I use a free apartment hunting magazine (which can be found near the exit of any grocery store) for a smaller tree.
- At first I was skeptical of the spray paint, I thought the magazine would get wet and fall apart, but it worked really well. I recommend green or gold paint, but definitely try different colors/shades to match your style. To add glitter, I just sprinkled it on while the paint was still wet but a spray adhesive + glitter would also work well.
Subscribe to:
Posts (Atom)