Tuesday, December 28, 2010

Holiday Baking

Cookies

I'd have to say that our favorite holiday project is a toss up between making ornaments and baking/decorating sugar cookies! This post is all about the desserts we made for our family Christmas party this year! While perusing the Martha Stewart website (we were searching for royal icing recipes at the time), we found these cute peppermint candy looking designs! Martha used a hard candy-shaped cookie-cutter, but, being resourceful, we figured that the simple circle cookie-cutter would look just as cute! (Really, you could use/try just about any simple design you have!) Here's how they came out:


There's a great how-to with step-by-step pictures for the marbleized peppermint-candy cookies on the Martha Stewart website here. We also did more traditional star, snowflake, and tree designs!


If you'd like to try our sugar cookie recipe, we'll put it in an up-coming post!

Cake Balls


A few months back, we discovered Bakerella and her lovely cake pops! We instantly fell in love with the idea and her great designs. However, our first attempt at making them was slightly disastrous--it's a bit harder than it looks. Forming the cake base is easy, it's trying to get a smooth chocolate shell that's difficult. (That might depend on the type of chocolate used.) That being said, the cake balls are incredibly delicious! Instead of the pops, we opt to make the cake balls because they don't require a super smoothe coating (think chocolate truffles).


We have some topped with crushed peppermint candy canes and others with grated white chocolate to look like snow. How festive!

We tend to make something new every year. What are some of your favorite holiday dessert recipes?

Friday, December 24, 2010

Merry Christmas!

A couple years ago, we bought a set of plain silver ornaments at an after-Christmas sale. Last year, we decided to paint these boring ornaments to brighten them up and embellish them a bit. We started each with a base of acrylic paint; then, we decorated them further with some fabric paint. We chose to use fabric paint mainly because we already had a bunch that we've collected over the years, but we also love how easy it is to maneuver. Also, we thought that the "puff" paint look would give the ornaments a nice 3D effect.

This first set fit nicely together. We love the classic colors! The rustic yellow is surprisingly delightful!

[Click to enlarge]

This next set of ornaments is a little more colorful and creative, though less cohesive than the first set. One of them is a glass cube, which reminded us of an ice cube. So, we filled the glass cube with blue and white tempera paint, then shook the cube until the paint was evenly distributed, creating a nice marble effect.   

[Click to enlarge]
Making ornaments has been a holiday tradition in our family since we were really young. It's so great to look at the ornaments that we've made over the years. (If you have kids, we recommend making a few new ornaments every year with them. Remember to write the year they were made on the ornaments, so you can look back!)

Also, ornaments make great hand-made gifts for family and friends!


Friday, December 17, 2010

Letter to Santa!

Just before Christmas, I saw the cutest felt Letter to Santa envelopes at a craft store. I almost bought one, then I thought that it would make a fun project to help get me into the Christmas spirit! I was really pleased with how it came out, so I decided to share it with you!

This project is simple and incredibly versatile! It's a great idea to personalize for children, or just for decoration!

1. Cut out the envelope shape from an 8"x10" piece of felt. Use the shape guideline I drew below, cutting along the solid lines. (You'll end up folding along the dotted lines later.) Make sure that the 2 big rectangles are the exact same size.


2. With the shape cut out, fold the bottom rectangle/flap up (along the dotted line), so that it aligns with the center rectangle. (TIP: Iron along the fold, to secure it.) It'll look like the this:

3. Fold in the side-flaps. (Iron along these folds.) Use fabric glue or a hot-glue gun to glue the flaps to the outside of the flap you folded up in step 2. It'll start looking like an envelope. *Instead of gluing the flaps down, you can pin them down and sew them, like I did. I used a thicker embroidery thread for a bolder look and to introduce a new color.*
(It'll look like this after step 3.)

4. Next, you'll want to cut a small buttonhole in the top, triangular flap. Then, you'll want to fold down this flap, iron it down flat, and sew a button, matching it up with the buttonhole, so that you can close your envelope. *You can also use Velcro to close the envelope.*

(After step 4, your envelope will look like this from the back.)

5. With the triangular flap down, the front of your envelope will look like a plain rectangle. So, all you need now is a few embellishments!

To make the stamp, cut out 2 small pieces of different colored felt. One should be a small rectangle, and the other should be a slightly larger rectangle with zig-zag cut edges.


Glue the small rectangle to the middle of the larger one. (Or you could sew it, like I did.)

(your stamp should look like this.)

Fasten it to the top right-hand corner of the envelope, and you're practically done!

6. All that's left is anymore embellishments! Here's where you can go crazy and get creative! I embroidered "To Santa" on the front of mine and sewed on holly made with more felt and red buttons! To personalize it, you could also add a child's name, if it's a gift or project for a child.


Monday, December 13, 2010

Advent Calendars

One of my favorite childhood Christmas memories is opening up the boxes on an advent calendar and discovering what images (or candy!) was underneath. I got to open the odd days and my sister got the even days, so we wouldn't fight.

I remember using the traditional paper door-style advent calendar when I was younger, but this year, I found some really interesting different types of advent calendars on blogs and in stores.
I love the style of this one!

This one is a garland!

Target

This one is made in a muffin tin! Very creative!

CopyCrafts (on Etsy) via Twelve Crafts Till Christmas

Last year I thought that it might be pretty cool to make my own advent calendar. I had initially thought it would be pretty simple to make the traditional cut-out doors type, but then I found this one on the Twelve Crafts Till Christmas Blog (shown above). I used this as the inspiration for the one my sister and I made. Here it is:

For ours, we used a big piece of cardboard that we had laying around the house, which we spray painted green and cut into a tree shape. Then we chose a few basic ornament designs that we cut out of cardstock and decorated them with numbers on one side and ornaments on the other side. We then poked small holes in the top, strung them on string and taped the string to the other side of the "tree." As the days go by, you can flip over the number sides to reveal a cool-looking Christmas ornament for the cardboard Christmas tree!

Wednesday, December 8, 2010

Magazine Christmas Trees!


Martha Stewart                                   

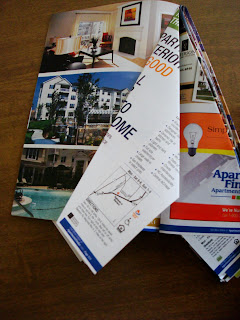
Last year, I discovered this wonderful craft while watching The Martha Stewart Show and I became addicted to making these magazine trees! Once you start you wont want to stop. They are so unbelievably easy to make because they are so self contained; All you really need is one magazine per tree plus some spray paint if you want to embellish it (but the trees even look cool unpainted!). This is one of the most satisfing craft projects I've ever done and they look so great when finished! There is a great video of the process from the Martha Stewart website; I encourage you all to watch, here. But here are some photos of my process.


1st fold: fold top left corner over to the edge, making a point at the top.
(It's like making a paper airplane).
 

2nd fold: fold newly folded edge over to the seam, keeping a sharp point at the top.
(Again, very much like the wing of a paper airplane!)
 

3rd fold: fold over (and tuck in) the little triangles that are hanging down
so that the bottom is flat.
 
Here is my finished product!


Some tips for those of you who give this a try:
  • Magazines with staple binding wont work; they must be the kind with glue (Good Housekeeping, not Time). Plus, you must thoroughly bend ("brake in") the binding so the tree will fan out front cover to back cover.
  • The more pages the magazine has, the fuller and better the tree will look.
  • Make sure each fold is really clean and uniform so that the top of the tree is nicely pointed.
  • To make a little forest of trees, it's nice to find magazines that are different sizes. I use a free apartment hunting magazine (which can be found near the exit of any grocery store) for a smaller tree.
  • At first I was skeptical of the spray paint, I thought the magazine would get wet and fall apart, but it worked really well. I recommend green or gold paint, but definitely try different colors/shades to match your style. To add glitter, I just sprinkled it on while the paint was still wet but a spray adhesive + glitter would also work well.

Friday, December 3, 2010

Decorating for the Holidays

Being December, we challenged ourselves to make a festive Holiday arrangement for our kitchen table in this lovely, eye-shaped glass bowl we had sitting around the house.

To add to this, we recently purchased some red and white Christmas ornaments from Michaels. They only cost around $2.00 for 8 cute ornaments, and they came in at least 10 different varieties and color schemes!

We thought the ornaments would look good in the bowl with some green, which we decided to get from cutting some evergreen branches from outside. And living in Maine, we had numerous different types of greens to choose from! We ended up cutting some white pine and blue spruce, but we ultimately chose to use Hemlock branches for the base because they were a little more petite and fit nicely in the bowl around the focal point of our arrangement, an old burgundy-colored candle we had hanging around the house. To add a different, green texture, we added some Myrtle (which grows abundantly by our house and reminds us of mistletoe).


After finishing the arrangement, we had some left-over evergreen clippings. We also had this beautiful square glass jar, which we've been dying to do something with. So we just added some leftover branches, ornaments, and some fake snow. We think looks pretty festive for a living room, kitchen, or entry way!


(We're still looking for more ideas for the jar so let us know if you have any. We'd love to hear your ideas!)

Wednesday, December 1, 2010

Welcome.

Welcome to our blog, Brighter Side Designs!

To introduce ourselves, we are Megan and Liss, two sisters from Southern Maine, who have been crafting together our whole lives. We are heavily inspired by Martha Stewart, having been big fans of her show since we were practically 10 years old! We love how she has fun with crafting, while taking it seriously and making it into an art.

We believe that crafting is a wonderful creative outlet. Even on a budget, you can make so many new decorations and other creations with things that you already have around your house! We love the fact that you can be resourceful, taking a few simple materials (like paper, glue, glitter, Sharpie, thread, ribbon, etc.), put them together and make something bigger and better. Our specialties are paper crafts, but we like to do many things--including baking and making festive arrangements!

We have created this blog together to share our mutual love for crafting with those who are interested in seeing, learning, and sharing some simple crafting projects--and, it being December 1st--there's no better time for getting crafty than the Christmas and holiday season!

Thanks for reading and following this blog. We love and are interested in any ideas (or questions) that come from our readers!

Thank you!
Megan & Liss